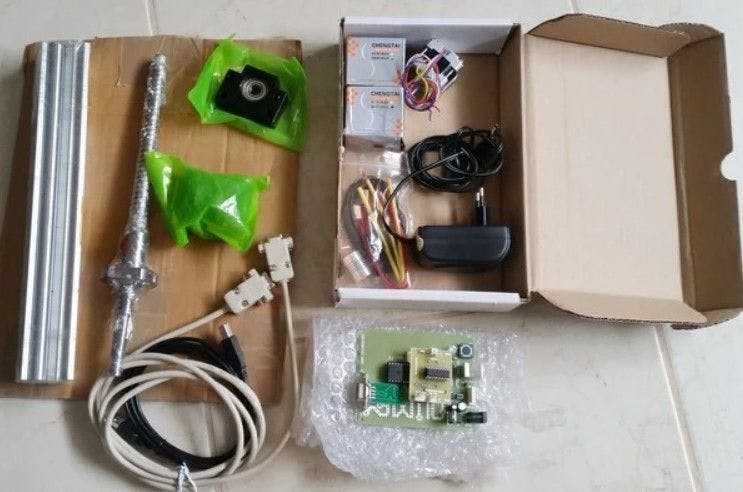
Bottom Up V3+ 3D printer build and test As part of my jewelry business, I use 3D printing for the creation of Castable masters for some of my jewelry. Mainly making unique and complex pieces for my clients, I need to quickly and faithfully print wax masters for our creations. I started my work on 3D printing in 2015 with the purchase of a 1200 Project 3DS printer, . I then changed my printer, for a Draken 3D printer from the company which is also an SLA type 3D printer offering a larger printing surface than the 1200 and the freedom to manage the light exposure parameters at will, allowing me to work with resins more economical than those of 3DS and especially castable. an honest review of which is published here (in French) 3DFacture Then, I now turned to a 3D printer, still SLA, but of a new type for me since printing from the bottom up, unlike the two previous printers which are of the Bottom-Up type. Bottom-up 3D printer operating principle Bottom-Up SLA printers print a layer of resin trapped between the print bed or back layer and a clear plastic film or silicon surface at the bottom of a print tray. On the contrary, the SLA Top-Down printer prints in the open air on the surface layer of the resin bath directly on the printing plate or directly on the front layer of cured resin. The obvious advantage of this type of technological choice is that it eliminates the need for a non-stick printing tray and that the printed part is not subjected to any stress during printing, eliminating any risk of damage. aborted printing and any risk of layer shift. The printer in question here, therefore, makes it possible to dispense with the non-stick tray supplier and to remain free as to the choice of the resin you wish to print. Where did I find such a cool 3D printer? There are very few of this type of printer on the market. This rather particular model is not sold by any specialized company but it is the fruit of the work of Frédéric Lautré, a self-taught man who showed it and developed it in his garage. You can visit his website presenting his work or his . The presentation seems light, yet this printer gives much better results in terms of reliability and cost than the two machines mentioned above for identical precision. The machine is sold as a kit, to be assembled yourself. Facebook page When the package is opened, we find the guiding elements of the printing plate, the electronic card and the motor, the cables, and what to do with the electrical part for the connection of the motor to the card. It may seem a bit complicated, but an online tutorial allows you to step by step set up the machine without hassle. For my part, I assembled the machine following the instructions in the assembly tutorial. The assembly goes smoothly, I just removed some screws fixing the endless screw bearings to the frame, the system being hyperstatic and giving me jerks during the first adjustments. For assembly, you need a jigsaw, a hand drill, and a soldering iron to solder a few wires. The estimated assembly time is 3 hours but when you have the experience, personally I went slowly and I started some parts several times. I spent a week on the assembly in parallel with my work with the back and forth to the DIY store. Here are some photos showing the stages of manufacture, frame in 18 mm CTP for the base and back of the machine, and 12 mm CTP for the side parts. And once the assembly is finished with a coat of paint: A little note on the construction: Frédéric (the inventor of this kit) now sells the v4 machine including the mechanics, the structure, and the map that avoids this part of the construction. The principle of V4 is the same as V3 or V3 +. The final dimensions of the machine are 30 cm wide, 28 cm deep and 65 cm high. Note that these measurements vary depending on your choice of structure. As for my machine, it is a mixture made up of the mechanics of the V3 version machine developed by Frédéric with the V4 version card of the machine hence the name V3 +. Regarding the V3 + and the V4, it is the same electronics, and the same software but not the same machine since the mechanics of the V4 are much smaller and are intended for jewelry for printing small parts while the V3 + kit presented here can print both small and large objects. As we can see, the aesthetic aspect is much less designed than what we can see on the market. On the other hand, in terms of performance in terms of precision, I am as precise as with the 1200 Project or the Draken for a fraction of the cost of these machines, 1200 euros including the Acer 6510bd projector. The print bed I chose and installed is 80 x 120mm, but most importantly, I can use it almost 90%, unlike my Draken which had an effective print area of around 50 x 80mm, a lot smaller than the size of the printing plate which was 110 x 190 mm. And let's not even talk about the 1200 Project ... View of the homemade 80 x 120 mm print bed 6 parts being printed, distributed over the whole plate, all the parts come out without worry, the whole plate is, therefore, usable for printing Focus and settings The mechanical adjustment is done without worries if the assembly of the frame is well done with particular attention to the respect for perpendicularity. I did the assembly with just a large square and a defect of a few degrees of perpendicularity will not impact the printed geometry. Having a level will be sufficient to avoid any big perpendicularity error. My only concern was the hyperstatic assembly of the worm, it is necessary to put the fewest screws possible for the assembly of the screw and the problem is solved. The worm is attached to the motor, which is itself attached to the frame, and passes through two guides attached to the frame which creates the hyperstatic system. I loosened the screws of the motor, and two of the four screws fixing the worm to the frame and I removed the other two so that the screw only communicates the vertical translational movement to the translational carriage without offering any constraints in X and Y. For mounting the projector, I decided to make from the start a perforated plate allowing me to place my projector at 6 different heights in order to be able to modify the size of the printed surface. The printing plate is adjusted to 0 height automatically via a switch. It will therefore always be necessary to adjust the height of the resin in the printing tank according to the 0 of the machine. This is completely new for the new user but is very easy once you have learned about the machine. Thanks to this, you only have to calibrate the projector once. The most important parameter in my opinion to make a good impression and have good adhesion of the parts to the printing plate is to do a lot of drilling of the printing plate so that the resin comes flush with the printing plate when you are at 0 machine. If this is not the case, we end up with an extra thickness of resin during the first exposure, too thick to allow good polymerization of the resin and therefore adhesion of the part to the plate. The resin then swells without really polymerizing and this prevents good adhesion to the printing plate. Concerning the plate, the holes are used for the flow of the resin to feed the layer to be printed but also to evacuate the surplus of resins when the printing plate is raised. A lack of perforation will generate an oversize resin bulb on the platen to cause the printing to fail. This effectively reduces the surface area of adhesion of the part with the plate, but since the part does not see any constraint, this poses no problem. Print management software This is certainly the most of this machine, it comes with software specifically developed by Frédéric to manage the prints. I used Creative Workshop before with my Draken, which is a creative commons license software that offers certain limits and sometimes crashes. The software developed by Frédéric seems a bit complicated at first but becomes easy to use once you have followed the instructions. View of the print settings control panel The control panel allows you to manage all the printing parameters as well as the dimensions of the vertical or offset printing supports. One tool in the software that I particularly like is viewing our sliced part on the platter and thus checking for “up” parts that require print support. The software offers 5 printing thicknesses: 12.5 microns, 25 microns, 50 microns, 75 microns, or 100 microns. A sectional view of our part, any part in the air appears clearly, allowing the supports to be positioned as best as possible Printing results I use resins from B9creations, which are affordable and pourable. The exposure time setting is 17 seconds with my Acer 6510bd projector, while it was 13 seconds with my Draken. Note that it is only 1 second for some FunToDo resins. The oxygen in the air seems to disturb the polymerization of the resin which then requires a longer exposure time. Price Regarding the cost of this printer, It cost 600 EUR with the delivery for the V3 + kit, 500 EUR for the projector, and approximately for the construction elements (a printing plate, translation carriage, wood, screws, etc. ..). A very powerful 3D printer kit is obtained for a very reasonable price, especially for a "Bottom-Up" type printer. My thoughts on this DIY bottom-up 3D printer To summarize in a few lines this machine compared to the 1200 project and the Draken, the positive points are: XYZ precision identical to competitors No broken or partially printed parts The cost is much lower than other machines to purchase No consumable costs except resin Freedom to use all resins on the market Quick support is given online via email or skype by a technician and not a salesperson The drawbacks are: The assembly may put off some and seem complicated for those who have never used an SLA 3D printer. video supports are missing to explain the operating principle of the machine and how to make the first adjustments (3DS is a reference for this with their clear videos) The engine mount is missing from the kit, although it is an economical and practical part (apparently this mount is now supplied in the kit). In conclusion, I would like to point out that the new machine developed, the V4 is fully delivered with its mechanics, the frame, and its electronic card, so that my comments only apply to the version of my machine. This 3d printer kit review was first and since then, it seems that Frédéric, the inventor and maker of this kit has stopped production or moved his website. I am trying to get back in touch with him. published in 2017 in French here We are in 2021 and I have now accumulated 4 years working with this printer without a single problem with software or printing due to this machine and I am more than satisfied with the quality and price of this 3d printer kit.