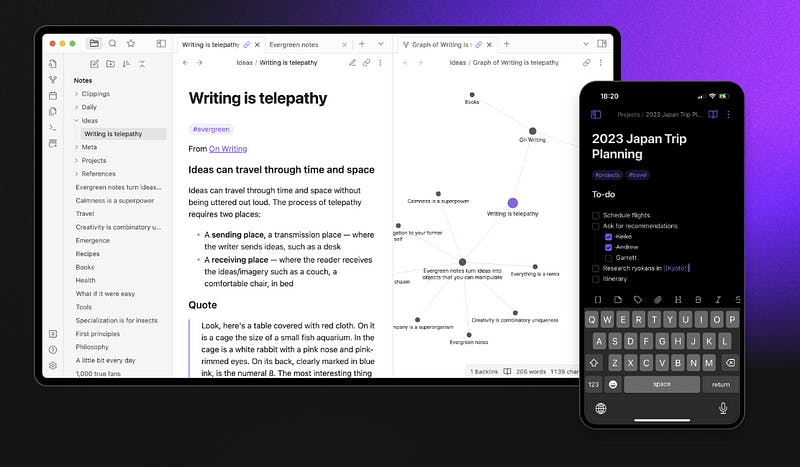
If you’re like me, you’ve probably tried countless apps to organize your thoughts, notes, and ideas. Then, I discovered Obsidian, which completely changed how I work. In this article, I’ll give you an easy-to-follow Obsidian tutorial to help you get started. We’ll talk about how to use Obsidian, its key features, and why it’s one of the best tools for note-taking. What Is Obsidian? Obsidian is not just another note-taking app. It’s a knowledge management tool that works by connecting your notes together, creating a sort of “second brain.” Think of it like a smart personal journal or a wiki for all your ideas. The best part? Obsidian notes are plain text files stored locally on your computer. This means you own your data completely, and you can back it up or move it anywhere. Why Use Obsidian? Here are a few reasons why I like Obsidian: Linked Notes: Imagine you’re writing about a book, and you want to connect it to notes about a specific idea, like “creativity.” With Obsidian, you can link one note to another, making it super easy to find related content. Local Storage: No cloud dependency! All your notes are stored on your device. This gives you control over your data and also means you can use it offline. Markdown Support: Obsidian uses Markdown, a simple formatting language that’s easy to learn. Customizable: Obsidian allows you to install plugins, change themes, and make your workspace look and feel the way you want. Free to Use: The core features are free forever, though there are optional paid plans for extra features. Obsidian Tutorial: How to Get Started Let me walk you through how to use Obsidian step by step. Don’t worry — it’s easier than it looks at first! Step 1: Download and Install Obsidian Visit Obsidian’s official website. Download the app for your operating system (Windows, macOS, or Linux). Install and open it. Once you launch it, you’ll be asked to create a new “vault.” Step 2: Create Your First Vault A vault in Obsidian is basically a folder where all your notes are stored. Here’s how you do it: Click “Create a new vault.” Give your vault a name (e.g., “My Notes” or “Personal Journal”). Choose a folder on your computer where the vault will be stored. Now, you’re ready to start taking notes! Step 3: Make Your First Note Click the “New Note” button (the paper icon) inside your vault. A blank note will appear. Give it a title, like “My First Note.” Start typing your content in the note. Step 4: Learn to Link Notes Here’s the magic: note linking. To link one note to another, use double square brackets. For example, type [[My First Note]] in another note, and it will create a link to it if the note exists; if it doesn’t exist, Obsidian will create it for you. If you click the link, it’ll jump to that note. This is how you can create a web of connected ideas over time. How to Use Obsidian Notes Effectively Once you’ve got the basics down, here are some tips to help you maximize your use of Obsidian: Use Tags and Folders for Organization. You can add tags to your notes by typing # followed by a word, like #idea or #project. Also, you can organize your notes into different folders. Tags and folders help you categorize and find notes quickly. Explore Backlinks. One of the coolest features in Obsidian is the backlink panel. Every time you link notes together, Obsidian automatically shows you what other notes are connected. Plugins. Explore the plugin library to add extra features like task management, calendars, or advanced search. Use the Graph View. The Graph View gives you a visual map of all your notes and their connections. Over time, you’ll see how your ideas are linked in one big network. Video Obsidian Tutorial https://youtu.be/4zWU4umAMoc?si=EgzfTjz69KI9v4br&embedable=true Conclusion Learning how to use Obsidian might take some time, but it’s worth it. Start small by creating a few notes and linking them together. Over time, you’ll build a system that feels natural and powerful. I hope this guide helps you get started. Happy note-taking! ;) If you’re like me, you’ve probably tried countless apps to organize your thoughts, notes, and ideas. Then, I discovered Obsidian, which completely changed how I work. In this article, I’ll give you an easy-to-follow Obsidian tutorial to help you get started. We’ll talk about how to use Obsidian, its key features, and why it’s one of the best tools for note-taking. What Is Obsidian? Obsidian is not just another note-taking app. It’s a knowledge management tool that works by connecting your notes together, creating a sort of “second brain.” Think of it like a smart personal journal or a wiki for all your ideas. The best part? Obsidian notes are plain text files stored locally on your computer. This means you own your data completely, and you can back it up or move it anywhere. Why Use Obsidian? Here are a few reasons why I like Obsidian: Here are a few reasons why I like Obsidian: Linked Notes: Imagine you’re writing about a book, and you want to connect it to notes about a specific idea, like “creativity.” With Obsidian, you can link one note to another, making it super easy to find related content. Local Storage: No cloud dependency! All your notes are stored on your device. This gives you control over your data and also means you can use it offline. Markdown Support: Obsidian uses Markdown, a simple formatting language that’s easy to learn. Customizable: Obsidian allows you to install plugins, change themes, and make your workspace look and feel the way you want. Free to Use: The core features are free forever, though there are optional paid plans for extra features. Linked Notes: Imagine you’re writing about a book, and you want to connect it to notes about a specific idea, like “creativity.” With Obsidian, you can link one note to another, making it super easy to find related content. Linked Notes: Imagine you’re writing about a book, and you want to connect it to notes about a specific idea, like “creativity.” With Obsidian, you can link one note to another, making it super easy to find related content. Linked Notes: Local Storage: No cloud dependency! All your notes are stored on your device. This gives you control over your data and also means you can use it offline. Local Storage: No cloud dependency! All your notes are stored on your device. This gives you control over your data and also means you can use it offline. Local Storage: Markdown Support: Obsidian uses Markdown, a simple formatting language that’s easy to learn. Markdown Support : Obsidian uses Markdown, a simple formatting language that’s easy to learn. Markdown Support Customizable: Obsidian allows you to install plugins, change themes, and make your workspace look and feel the way you want. Customizable: Obsidian allows you to install plugins, change themes, and make your workspace look and feel the way you want. Customizable: Free to Use: The core features are free forever, though there are optional paid plans for extra features. Free to Use: The core features are free forever, though there are optional paid plans for extra features. Free to Use: Obsidian Tutorial: How to Get Started Let me walk you through how to use Obsidian step by step. Don’t worry — it’s easier than it looks at first! Step 1: Download and Install Obsidian Visit Obsidian’s official website. Visit Obsidian’s official website . Obsidian’s official website Obsidian’s official website Download the app for your operating system (Windows, macOS, or Linux). Download the app for your operating system (Windows, macOS, or Linux). Install and open it. Once you launch it, you’ll be asked to create a new “vault.” Install and open it. Once you launch it, you’ll be asked to create a new “vault.” Step 2: Create Your First Vault A vault in Obsidian is basically a folder where all your notes are stored. Here’s how you do it: Click “Create a new vault.” Click “Create a new vault.” Give your vault a name (e.g., “My Notes” or “Personal Journal”). Give your vault a name (e.g., “My Notes” or “Personal Journal”). Choose a folder on your computer where the vault will be stored. Choose a folder on your computer where the vault will be stored. Now, you’re ready to start taking notes! Step 3: Make Your First Note Click the “New Note” button (the paper icon) inside your vault. Click the “New Note” button (the paper icon) inside your vault. A blank note will appear. Give it a title, like “My First Note.” A blank note will appear. Give it a title, like “My First Note.” Start typing your content in the note. Start typing your content in the note. Start typing your content in the note. Step 4: Learn to Link Notes Here’s the magic: note linking. To link one note to another, use double square brackets. For example, type [[My First Note]] in another note, and it will create a link to it if the note exists; if it doesn’t exist, Obsidian will create it for you. If you click the link, it’ll jump to that note. To link one note to another, use double square brackets. For example, type [[My First Note]] in another note, and it will create a link to it if the note exists; if it doesn’t exist, Obsidian will create it for you. If you click the link, it’ll jump to that note. To link one note to another, use double square brackets. For example, type [[My First Note]] in another note, and it will create a link to it if the note exists; if it doesn’t exist, Obsidian will create it for you. If you click the link, it’ll jump to that note. This is how you can create a web of connected ideas over time. How to Use Obsidian Notes Effectively Once you’ve got the basics down, here are some tips to help you maximize your use of Obsidian: Use Tags and Folders for Organization. You can add tags to your notes by typing # followed by a word, like #idea or #project. Also, you can organize your notes into different folders. Tags and folders help you categorize and find notes quickly. Use Tags and Folders for Organization . You can add tags to your notes by typing # followed by a word, like #idea or #project. Also, you can organize your notes into different folders. Tags and folders help you categorize and find notes quickly. Use Tags and Folders for Organization Explore Backlinks. One of the coolest features in Obsidian is the backlink panel. Every time you link notes together, Obsidian automatically shows you what other notes are connected. Explore Backlinks. One of the coolest features in Obsidian is the backlink panel. Every time you link notes together, Obsidian automatically shows you what other notes are connected. Explore Backlinks . One of the coolest features in Obsidian is the backlink panel. Every time you link notes together, Obsidian automatically shows you what other notes are connected. Explore Backlinks Plugins. Explore the plugin library to add extra features like task management, calendars, or advanced search. Plugins . Explore the plugin library to add extra features like task management, calendars, or advanced search. Plugins Use the Graph View. The Graph View gives you a visual map of all your notes and their connections. Over time, you’ll see how your ideas are linked in one big network. Use the Graph View . The Graph View gives you a visual map of all your notes and their connections. Over time, you’ll see how your ideas are linked in one big network. Use the Graph View Video Obsidian Tutorial https://youtu.be/4zWU4umAMoc?si=EgzfTjz69KI9v4br&embedable=true https://youtu.be/4zWU4umAMoc?si=EgzfTjz69KI9v4br&embedable=true Conclusion Learning how to use Obsidian might take some time, but it’s worth it. Start small by creating a few notes and linking them together. Over time, you’ll build a system that feels natural and powerful. I hope this guide helps you get started. Happy note-taking! ;)