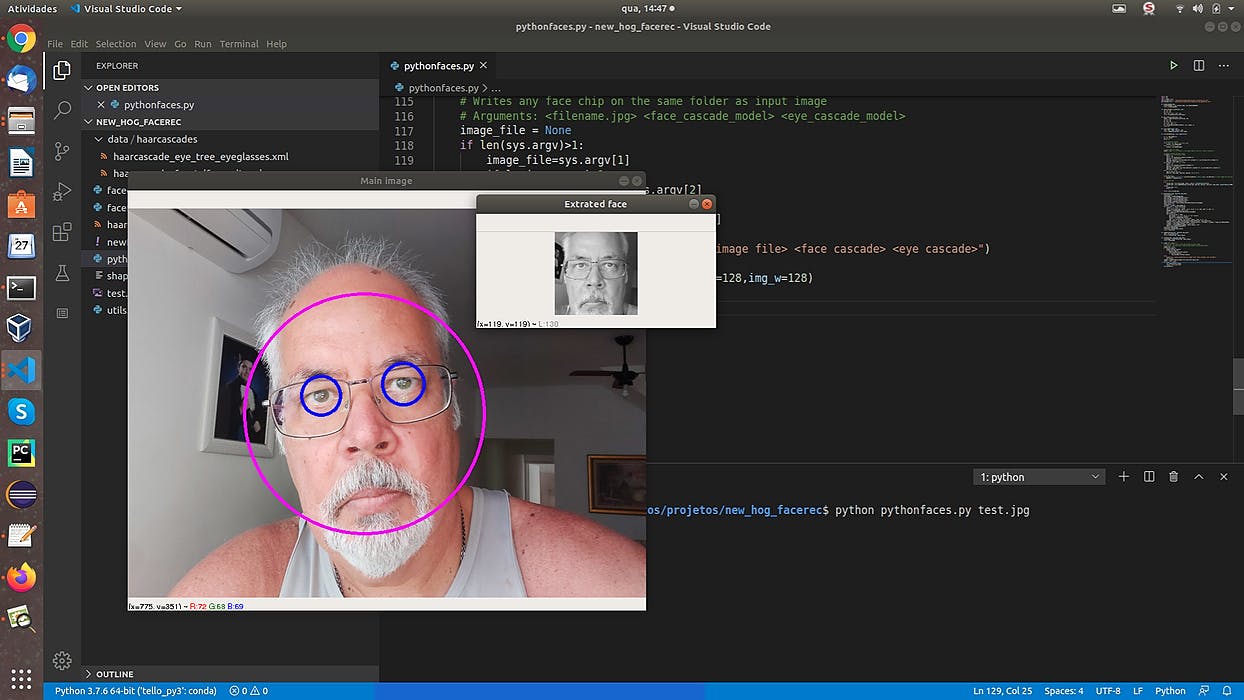
For people with vision problems. Click here for a vídeo presentation https://github.com/cleuton/audio_object_recognizer It's in Portuguese, but you can remove the translation and leve it talking in english. Just change line #81 of script . libdetect.py Finally I finished the audible object detector proof of concept. The goal is to create something that can be used by people with visual needs. This is a proof of concept, or an MVP. I used: Raspberry Pi 3 with Raspbian; Ultrasonic detector HC-SR04; Raspberry Pi Camera; Yolo model; OpenCV; In this demo, I'm using Yolo (You Only Look Once), with python and OpenCV. I was inspired by the article to create this PoC. Adrian Rosebrock I've tested with CNN models in Keras, using banks like and , but Yolo's performance is better, although less accurate. CIFAR COCODataset It is still an unfinished project, but I decided to share it for you to help me and develop your own solutions. I'm using Google's library to transcribe text to audio. gTTS Prototype assembly You will need: Flat cable to connect Raspberry PI to a protoboard; Raspberry PI 3; Raspberry Camera; Ultrasonic sensor HC-SR04; 330 ohm resistor; 470 ohm resistor; Switch; Jumpers; To connect an HC-SR04 sensor to the Raspberry PI, follow the instructions . The image of the article is this: in this article I used the GPIOs: 17 (TRIGGER) and 24 (ECHO). In the image, he used: 18 (TRIGGER) and 24 (ECHO). Connect the switch by connecting the circuit ground (GND) and the GPIO 25. When you press the Switch, this GPIO will change the state and command a photo. Setup Clone the Darknet project (git clone ) and copy following files to folder: https://github.com/pjreddie/darknet yolo darknet/cfg/yolov3.cfgdarknet/data/coco.names Click and download the yolov3.weights file and save it in the folder. on this link yolo Install . It is better if you have also installed, just create a virtual environment with the command: VLC Anaconda conda env create -f ./env.yml conda activate object To execute, just run the script : simple_detector.py python simple_detector.py If you want, you can pass the path of an image file to test. I attached 2 images for you to test. Oh, and I created a JSON Dictionary to translate the names of the objects found (to Portuguese), but if you are an english speaker, just use the original names. Executing on the Raspberry PI Install the conda environment: . env-armhf.yml The and the scripts must be installed on the Raspberry PI. The script starts the object detection loop. libdetect.py raspdetector.py raspdetector.py By pressing the the device will take a photo and tell you the objects that are in it and the distance to the closest object (see the video). switch Read the to see how to install the rest of the components on your Raspberry PI. OpenCV installation Previously published at https://github.com/cleuton/audio_object_recognizer/blob/master/english.md