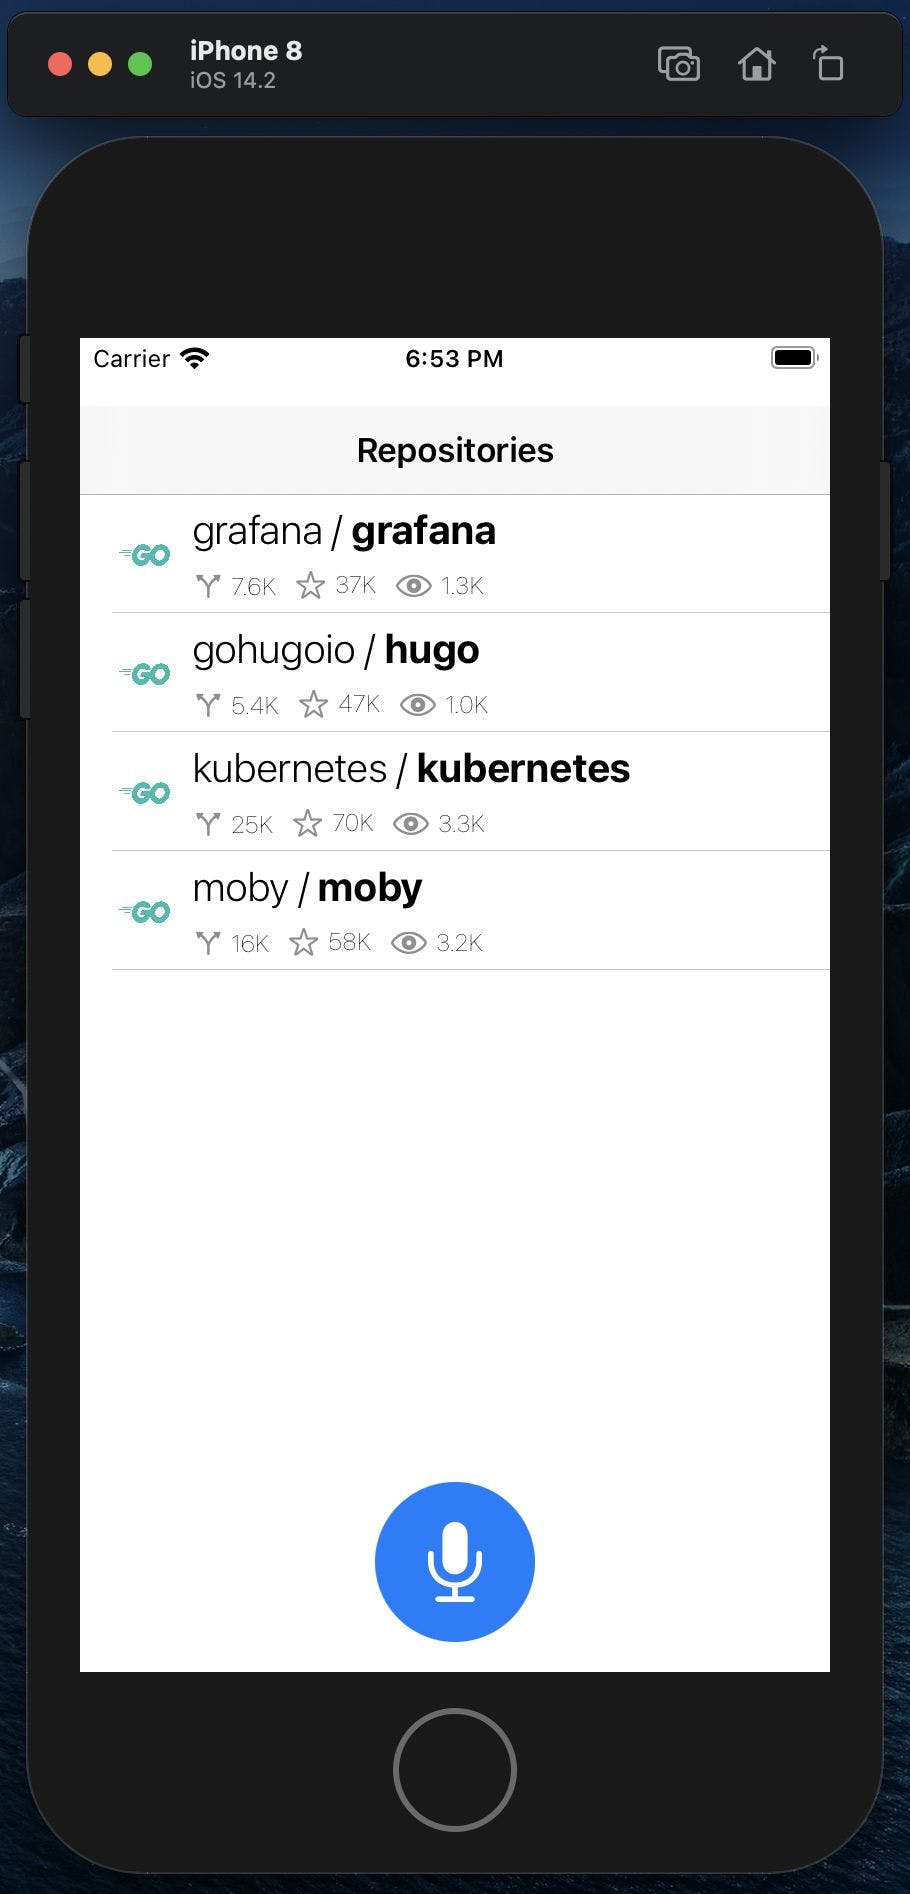
ntroduction This tutorial will help you to get up and running with by guiding you through the process of building a simple voice filtering web app with Speechly and SwiftUI. Speechly You can find the source code for this tutorial on GitHub. Prerequisites We'll be using Xcode and iOS simulator, so make sure you have those installed. Xcode 12 iOS Simulator with iOS version 14.0 or later This tutorial assumes that you know the basics of iOS development and the Swift programming language. Feel free to check the official Apple documentation to get started with or . Swift SwiftUI Create a new Xcode project First, we'll need a new iOS app project. Let's create one! 1. Open Xcode and go to > > File New Project 2. Under the set of iOS templates, choose : App 3. Click and fill in your project details. Name your project , choose as your interface option, as life cycle and for the language. Next SpeechlyRepoFiltering SwiftUI SwiftUI App Swift 4. Click once more and you should have your project created for you. Next Adding Speechly client dependency Next we need to add Speechly client library to our project. 1. Click > > : File Swift Packages Add Package Dependency 2. Specify as the package repository and click Next: https://github.com/speechly/ios-client.git 2. Specify as the package repository and click https://github.com/speechly/ios-client.git Next: 3. Xcode will fetch the package information for you and will ask you to specify the version. Leave the default rules in and click : Next 4. After the Xcode fetches the package and its dependencies, it will ask which target you want to add it to. Make sure you have product added to and the checkbox checked and then click : Speechly SpeechlyRepoFiltering Finish Add repo data and layout Now that we have the project ready, let’s start coding! Since we are building a filtering app, let’s add some data to filter and layout to display it. To make it simple, our data source will be just a static array with some popular repositories on GitHub. First, let’s add the data model and save it as : GithubRepoModel.swift Foundation { { = = = } id: name: organisation: language: followers: stars: forks: } import : , struct GithubRepo Hashable Identifiable : , enum Language String Hashable case Go "Go" case Python "Python" case TypeScript "TypeScript" let Int let String let String let Language let Int let Int let Int Now let’s add a repository that will return us some sample data. Add the following code to : GithubRepoRepository.swift Foundation { shared = () -> [ ] { .repositories } repositories = [ ( id: , name: , organisation: , language: . , followers: , stars: , forks: ), ( id: , name: , organisation: , language: . , followers: , stars: , forks: ), ( id: , name: , organisation: , language: . , followers: , stars: , forks: ), ( id: , name: , organisation: , language: . , followers: , stars: , forks: ), ( id: , name: , organisation: , language: . , followers: , stars: , forks: ), ( id: , name: , organisation: , language: . , followers: , stars: , forks: ), ( id: , name: , organisation: , language: . , followers: , stars: , forks: ), ( id: , name: , organisation: , language: . , followers: , stars: , forks: ), ( id: , name: , organisation: , language: . , followers: , stars: , forks: ), ( id: , name: , organisation: , language: . , followers: , stars: , forks: ), ( id: , name: , organisation: , language: . , followers: , stars: , forks: ), ( id: , name: , organisation: , language: . , followers: , stars: , forks: ) ] } import class GithubRepoRepository static let GithubRepoRepository func list () GithubRepo return self private let GithubRepo 1 "typescript" "microsoft" TypeScript 2200 65000 8700 GithubRepo 2 "nest" "nestjs" TypeScript 648 30900 2800 GithubRepo 3 "vscode" "microsoft" TypeScript 3000 105000 16700 GithubRepo 4 "deno" "denoland" TypeScript 1700 68000 3500 GithubRepo 5 "kubernetes" "kubernetes" Go 3300 70700 25500 GithubRepo 6 "moby" "moby" Go 3200 58600 16900 GithubRepo 7 "hugo" "gohugoio" Go 1000 47200 5400 GithubRepo 8 "grafana" "grafana" Go 1300 37500 7600 GithubRepo 9 "pytorch" "pytorch" Python 1600 43000 11200 GithubRepo 10 "tensorflow" "tensorfow" Python 8300 149000 82900 GithubRepo 11 "django" "django" Python 2300 52800 22800 GithubRepo 12 "airflow" "apache" Python 716 18500 7200 Now that we have the data, time to visualise it. Let’s add some SwiftUI components for that. Let’s start by adding a list view, save the following code as : RepoList.swift SwiftUI { repos: [ ] = [] body: some { { (repos) { repo (repo: repo) } .navigationBarTitle( ( ), displayMode: .inline) } } } { previews: some { (repos: .shared.list()) } } import : struct RepoList View var GithubRepo var View NavigationView List in RepoRow Text "Repositories" : struct RepoList_Previews PreviewProvider static var View RepoList GithubRepoRepository Notice the - it’s a handy way to quickly preview your components without running the app! RepoList_Previews As you can see, our list view uses another component, . Let’s add some code to to define it: RepoRow RepoRow.swift SwiftUI { repo: body: some { { (imageName()) .resizable().frame(width: , height: , alignment: .center) (alignment: .leading, spacing: ) { ( ).font(.system(size: )).fontWeight(.light) + (repo.name).font(.system(size: )).fontWeight(.bold) (alignment: .lastTextBaseline) { (name: , label: formatNumber(repo.forks)) (name: , label: formatNumber(repo.stars)) (name: , label: formatNumber(repo.followers)) } } } } -> { (value < ) { (value) } (value < ) { } } -> { .repo.language { . : . : . : } } } import : struct RepoRow View let GithubRepo var View HStack Image 32 32 VStack 7 Text "\(repo.organisation) / " 20 Text 20 HStack LabeledIcon "arrow.branch" LabeledIcon "star" LabeledIcon "eye" private func formatNumber ( value: Int) _ String if 1000 return String if 10000 return "\(String(Double(value) / 1000))K" return "\(String(value / 1000))K" private func imageName () String switch self case Go return "logo-go" case Python return "logo-python" case TypeScript return "logo-ts" OK, now as you can see we are referencing some images with language logos, so let’s add those to our project. Download and extract , then you should have the following files: LanguageLogos.zip logo-go.png logo-python.png logo-typescript.png Now let’s add them to our project: Select in the navigation bar in Xcode, then click the button in the bottom pane and finally click on the : Assets.xcassets + Image Set Type logo-go as the name, then drag and drop the logo-go.png file to all sizes (1x, 2x and 3x) placeholders. Repeat the same for logo-python and logo-typescript and you should have the following result: Lastly, there is one more component to add - the . Let’s add the following code and save it as : LabeledIcon LabeledIcon.swift SwiftUI { name: label: body: some { (spacing: ) { (systemName: name).foregroundColor(.gray).imageScale(.small) (label).font(.system(.caption)).fontWeight(.ultraLight) } } } import : struct LabeledIcon View let String let String var View HStack 3 Image Text Voila! Now you can go ahead and try running the preview for . You should see something like this: RepoList Add microphone button and transcript text Now that we have some data to work with and we can visualise it, time to add a button for activating the microphone and a simple component to display the transcript of what a user is saying. Save the following code as : Microphone.swift SwiftUI { onStart: () -> onStop: () -> body: some { (onDown: startRecording, onUp: stopRecording) { () .frame(width: , height: ) .foregroundColor(.blue) .overlay( (systemName: ) .resizable() .aspectRatio(contentMode: .fit) .frame(width: , height: ) .foregroundColor(.white) ) }.buttonStyle( ()) } { .onStart() } { .onStop() } { -> some { configuration.label .scaleEffect(configuration.isPressed ? : ) .animation(.easeInOut) } } } { previews: some { (onStart: {}, onStop: {}) } } import : struct MicrophoneButton View let Void let Void var View ToggleButton Circle 80 80 Image "mic.fill" 40 40 Style private func startRecording () self private func stopRecording () self private : struct Style ButtonStyle func makeBody (configuration: Configuration) View 1.25 1.0 : struct MicrophoneButton_Previews PreviewProvider static var View MicrophoneButton And since it uses a component, let’s add it as : ToggleButton ToggleButton.swift SwiftUI { @ isDown = onDown: () -> onUp: () -> content: () -> body: some { (action: {}, label: { .content() }).simultaneousGesture( (minimumDistance: , coordinateSpace: .local) .onChanged { .isDown { } .isDown = .onDown() } .onEnded { .isDown = .onUp() } ) } } import < : >: struct ToggleButton Content View View State private var false let Void let Void let Content var View Button self DragGesture 0 _ in if self return self true self _ in self false self And for the transcript, let’s add the following to : TranscriptText.swift SwiftUI Speechly { words: [ ] body: some { words. ( ( )) { (acc, word) acc + ( ) + (word.value).fontWeight(word.isFinal ? .bold : .light) } } } { previews: some { (words: [ ( index: , value: , startOffset: ( ), endOffset: ( ), isFinal: ), ( index: , value: , startOffset: ( ), endOffset: ( ), isFinal: ), ( index: , value: , startOffset: ( ), endOffset: ( ), isFinal: ), ( index: , value: , startOffset: ( ), endOffset: ( ), isFinal: ), ( index: , value: , startOffset: ( ), endOffset: ( ), isFinal: ) ]) } } import import : struct TranscriptText View let SpeechTranscript var View reduce Text "" in Text " " Text : struct TranscriptText_Previews PreviewProvider static var View TranscriptText SpeechTranscript 1 "SHOW" TimeInterval 0 TimeInterval 0.1 true SpeechTranscript 2 "ME" TimeInterval 0 TimeInterval 0.1 true SpeechTranscript 3 "ALL" TimeInterval 0 TimeInterval 0.1 true SpeechTranscript 4 "GO" TimeInterval 0 TimeInterval 0.1 false SpeechTranscript 5 "REPOS" TimeInterval 0 TimeInterval 0.1 false Notice that we are using a here - a type imported from Speechly package. We show final transcripts (those that won’t change in the future) as bold and tentative (or non-final, meaning they can still change) as light to differentiate between them. SpeechTranscript Finally, let’s update our and add our new components and a preview: ContentView.swift SwiftUI Speechly { repos: [ ] transcript: [ ] startRecording: () -> stopRecording: () -> body: some { { (words: transcript) (repos: repos) (onStart: startRecording, onStop: stopRecording) .padding(.bottom, ) } } } { previews: some { ( repos: .shared.list(), transcript: [ ( index: , value: , startOffset: ( ), endOffset: ( ), isFinal: ), ( index: , value: , startOffset: ( ), endOffset: ( ), isFinal: ), ( index: , value: , startOffset: ( ), endOffset: ( ), isFinal: ), ( index: , value: , startOffset: ( ), endOffset: ( ), isFinal: ), ( index: , value: , startOffset: ( ), endOffset: ( ), isFinal: ) ], startRecording: {}, stopRecording: {} ) } } import import : struct ContentView View let GithubRepo let SpeechTranscript let Void let Void var View VStack TranscriptText RepoList MicrophoneButton 15 : struct ContentView_Previews PreviewProvider static var View ContentView GithubRepoRepository SpeechTranscript 1 "SHOW" TimeInterval 0 TimeInterval 0.1 true SpeechTranscript 2 "ME" TimeInterval 0 TimeInterval 0.1 true SpeechTranscript 3 "ALL" TimeInterval 0 TimeInterval 0.1 true SpeechTranscript 4 "GO" TimeInterval 0 TimeInterval 0.1 false SpeechTranscript 5 "REPOS" TimeInterval 0 TimeInterval 0.1 false To make sure our project can still be built, we also need to update : SpeechlyRepoFilteringApp.swift SwiftUI @main { body: some { { ( repos: .shared.list(), transcript: [], startRecording: {}, stopRecording: {} ) } } } import : struct SpeechlyRepoFilteringApp App var Scene WindowGroup ContentView GithubRepoRepository Go ahead and build the project and then check out the preview. You should see something like this: ContentView Configure your Speechly application Before we proceed with the app, let’s take a quick detour and create our Speechly app. Go to and login (or sign up if you haven’t yet) and create a new app (you can if you feel lost). https://api.speechly.com/dashboard check our Speechly Dashboard quickstart guide Let’s add a couple of simple commands for manipulating the data we see in the table: A command to filter by programming language, e.g., when a user says, “Show me TypeScript repos,” the app will only show repos with that specific language.A command to sort the results in a specific order, e.g., “Sort the results by forks,” will sort the repos by the number of forks it has. A command to reset the filters, e.g., “Reset the filters to default,” will remove the language filter and reset the sorting to some default. Let’s add the following to our app configuration: languages = [ Go TypeScript Python ] sort_fields = [ name language followers stars forks ] results = [ items results repos repositories ] *filter show {me} {[all | only]} $languages(language) {$results} *filter filter {$results} by $languages(language) {language} *sort [sort | order] {the} {$results} by $sort_fields(sort_field) *reset [reset | remove] {[the | all]} {filters} {to } default Don’t forget to add sort, filter, and reset as intents and languages and sort_fields as entities! As you can see from the comments, this configuration will make our Speechly app understand the commands we need and properly detect entities and intents. Keep in mind that the cool part is that the model will also be able to understand the variations of commands that are not explicitly defined in our configuration. The same also applies to entities - the app won’t be limited to only detecting “Go”, “TypeScript”, and “Python” as options for the language, but other words as well, which will be roughly in the same place in a phrase. For instance, you could try saying, “Show me all Javascript repos”). However, with very domain-specific words, it’s always a good idea to list them all in your configuration; otherwise, they might be mistaken for some regular words. For example, the API might not properly detect “Rust” as a programming language if you say, “Show me all Rust repositories,” because it would think that you meant “rust” as that thing that destroys metals. You can read more about how to configure Speechly applications . in Speechly documentation Now that we have our Speechly app deployed, let’s integrate it! Integrate Speechly client Let’s use an observable pattern and create a manager which will handle Speechly connection and provide us with the recognition results. Add the following code to : SpeechlyManager.swift Foundation SwiftUI Speechly { client: active: @ transcript: [ ] = [] @ : = .empty () { .active = .client = ! ( appId: (uuidString: )!, language: .enUS ) .client.delegate = } { ! .active { } .client.start() } { ! .active { } .client.stop() } { .active { .client.suspend() .active = } } { ! .active { ! .client.resume() .active = } } } { { .main.async { .transcript = [] } } { .main.async { .transcript = [] } } { .main.async { segment.intent.value.lowercased() { : . = ( languageFilter: .parseLanguageFilter(segment), sortOrder: . .sortOrder ) : . = ( languageFilter: . .languageFilter, sortOrder: .parseSortOrder(segment) ) : . = .empty : } .transcript = segment.transcripts } } -> . { order = defaultOrder e segment.entities { e.type.lowercased() != { } e.value.lowercased() { : order = .name : order = .language : order = .followers : order = .stars : order = .forks : } } order } -> [ . ] { languages = initialValue e segment.entities { e.type.lowercased() != { } e.value.lowercased() { : languages.append(. ) : languages.append(. ) : languages.append(. ) : } } languages } } import import import : class SpeechlyManager ObservableObject let SpeechClient var Bool Published var SpeechTranscript Published var filter GithubRepoFilter GithubRepoFilter init self true self try SpeechClient UUID "your-speechly-app-id" self self func start () if self return self func stop () if self return self func suspend () if self self self false func resume () if self try self self true : extension SpeechlyManager SpeechClientDelegate func speechlyClientDidStart ( : SpeechClientProtocol) _ DispatchQueue self func speechlyClientDidStop ( : SpeechClientProtocol) _ DispatchQueue self func speechlyClientDidUpdateSegment ( client: SpeechClientProtocol, segment: SpeechSegment) _ DispatchQueue switch case "filter" self filter GithubRepoFilter self self filter case "sort" self filter GithubRepoFilter self filter self case "reset" self filter GithubRepoFilter default break self private func parseSortOrder ( segment: SpeechSegment, defaultOrder: GithubRepoFilter.SortOrder = GithubRepoFilter.empty.sortOrder ) _ GithubRepoFilter SortOrder var for in if "sort_field" continue switch case "name" case "language" case "followers" case "stars" case "forks" default continue return private func parseLanguageFilter ( segment: SpeechSegment, initialValue: [GithubRepo.Language] = []) _ GithubRepo Language var for in if "language" continue switch case "go" Go case "python" Python case "typescript" TypeScript default continue return Make sure you update the language and the app id in the initialiser! Now, there’s a lot to explain here, so here’s the gist: SpeechlyManager creates our client. To initialise the client you need to pass at least appId and language, which you can find from the app page in the dashboard.To enable the microphone and start sending data to the API you should use client.start() method. Similarly, you use client.stop() for stopping current call.To receive recognition results (and also some status updates and errors) you need to implement the SpeechClientDelegate pattern and pass the delegate to the client. Our manager uses speechlyClientDidUpdateSegment to react to recognition results and speechlyClientDidStart / speechlyClientDidStop for resetting current transcript. Note also the usage of DispatchQueue.main - this is a requirement of the platform that observable values should only be updated from the main dispatch queue.To handle the results, you would need to parse them, relying on intent values and entity types / values.client.suspend() and client.resume() provide functionality for suspending and resuming the client execution - this will come in handy later! Check out for more information about how SLU API works! this article in the Speechly documentation As you probably noticed, we are using a as a container for our filters, but we haven’t defined it yet. Let’s do that! Add the following to : GithubRepoFilter GithubRepoFilter.swift Foundation { { name, language, followers, stars, forks } empty = (languageFilter: [], sortOrder: .name) languageFilter: [ . ] sortOrder: (languageFilter: [ . ], sortOrder: ) { .languageFilter = languageFilter .sortOrder = sortOrder } -> [ ] { res = input .languageFilter. > { res = res. { repo .languageFilter. (repo.language) } } res.sorted { ( , ) .sortOrder { .name: .name < .name .language: .language.rawValue < .language.rawValue .followers: .followers < .followers .stars: .stars < .stars .forks: .forks < .forks } } } } import class GithubRepoFilter enum SortOrder case static let GithubRepoFilter var GithubRepo Language var SortOrder init GithubRepo Language SortOrder self self func apply ( input: [GithubRepo]) _ GithubRepo var if self count 0 filter in self contains return left right in switch self case return left right case return left right case return left right case return left right case return left right Nothing fancy here - just some logic for sorting and filtering an array of structs! GithubRepo Tying everything together Now that we have all the pieces ready, let’s tie them all together in our ! Let’s update it with the following code: SpeechlyRepoFilteringApp.swift SwiftUI Speechly @main { @ (\.scenePhase) scenePhase @ speechlyManager = () body: some { { ( repos: .speechlyManager. .apply( .shared.list()), transcript: .speechlyManager.transcript, startRecording: .speechlyManager.start, stopRecording: .speechlyManager.stop ) }.onChange(of: .scenePhase) { newPhase newPhase { .background: .speechlyManager.suspend() .active: .speechlyManager.resume() : } } } } import import : struct RepoFilteringApp App Environment var ObservedObject var SpeechlyManager var Scene WindowGroup ContentView self filter GithubRepoRepository self self self self in switch case self case self default break A couple of things going on here: We use the to observe the state of . This will automatically update our app with new values of filter and transcript properties defined by the manager. @ObservedObject SpeechlyManager We use the to track the state of our main (and only) scene phase and react when the scene (and thus the application) enters background state (i.e. it gets suspended by the OS) and leaves it. We use this to suspend and resume our Speechly client - this ensures that we release the microphone and disconnect from the API when those resources are not needed. @Environment(\.scenePhase) Conclusion And that’s it! Now you can build the app and run it in the simulator. Keep in mind that many of the SwiftUI features are only available on iOS 14.0 and above, so make sure to pick the appropriate simulator target. Go ahead and try out your app - you can filter the repos by language, apply a sorting order, and reset the filters: If you want to delve into the details, go ahead and check out and . our documentation our public GitHub You can also find the source code for this tutorial at - feel free to poke around or use it as a starter for your next Speechly app! https://github.com/speechly/ios-repo-filtering You can also read more about best practices on building voice user interfaces in this . guide Also published on Speechly .